Search engine optimization (SEO) helps your site get discovered and understood by search engines like Google and Bing. SEO Checklist in Drupal CMS provides a helpful to-do list of SEO-related tasks and tools that you can use to boost your site's visibility. This guide explains each checklist item in plain language so you can make informed decisions about which actions to take.
By the end of this tutorial, you will be able to:
- Understand the purpose of each SEO Checklist action item.
- Identify which actions are recommended for most Drupal CMS websites.
- Know when certain modules or tasks apply only to specific types of sites.
Goal
Confidently use the SEO Checklist to optimize your site for search engines.
Back to topPrerequisites
- SEO essentials: what you should know
- Install and explore SEO Tools in Drupal CMS
- Enable functionality with modules
Back to top
Access the SEO Checklist
The SEO Checklist is installed with the SEO Tools recommended add-on. If you haven’t already, Install and explore SEO Tools in Drupal CMS.
Access the SEO Checklist by navigating to Configuration > Search and metadata > SEO Checklist (admin/config/search/seo-checklist).
First action: confirm pre-checked items
When you first install the SEO Tools add-on, certain items in the SEO Checklist were automatically completed, so they are already toggled “on” but the form is only temporarily saved. You should review these items, and then save your progress.
- Navigate to Configuration > Search and metadata > SEO Checklist (admin/config/search/seo-checklist). For each group, take note of the items that are toggled “on” in each group. These actions have already been completed by the system when you installed Drupal CMS and installed the SEO Tools add-on.
- Save the form to record the changes. You’ll see a note next to the item with the date it was completed and the user that saved the form when the item was toggled “on”.
Using SEO Checklist
For action items that involve installing a module, once the module is installed, the item will be automatically toggled “on”.
Manually toggle “on” other types of items once you’ve completed the recommended course of action, for example, configuring a module’s settings.
Back to topResetting the SEO Checklist form
Next to the Save button is a Clear saved progress button.
Clearing saved progress will do the following:
- All items manually toggled “on” by a user will be toggled “off”.
- The items already completed by the system, such as modules already installed, will be toggled “on” and the same initial message about saving the form to record the changes will be displayed.
- Save the form to record the changes completed by the system.
Let’s learn more about each recommendation in the SEO Checklist.
Back to top
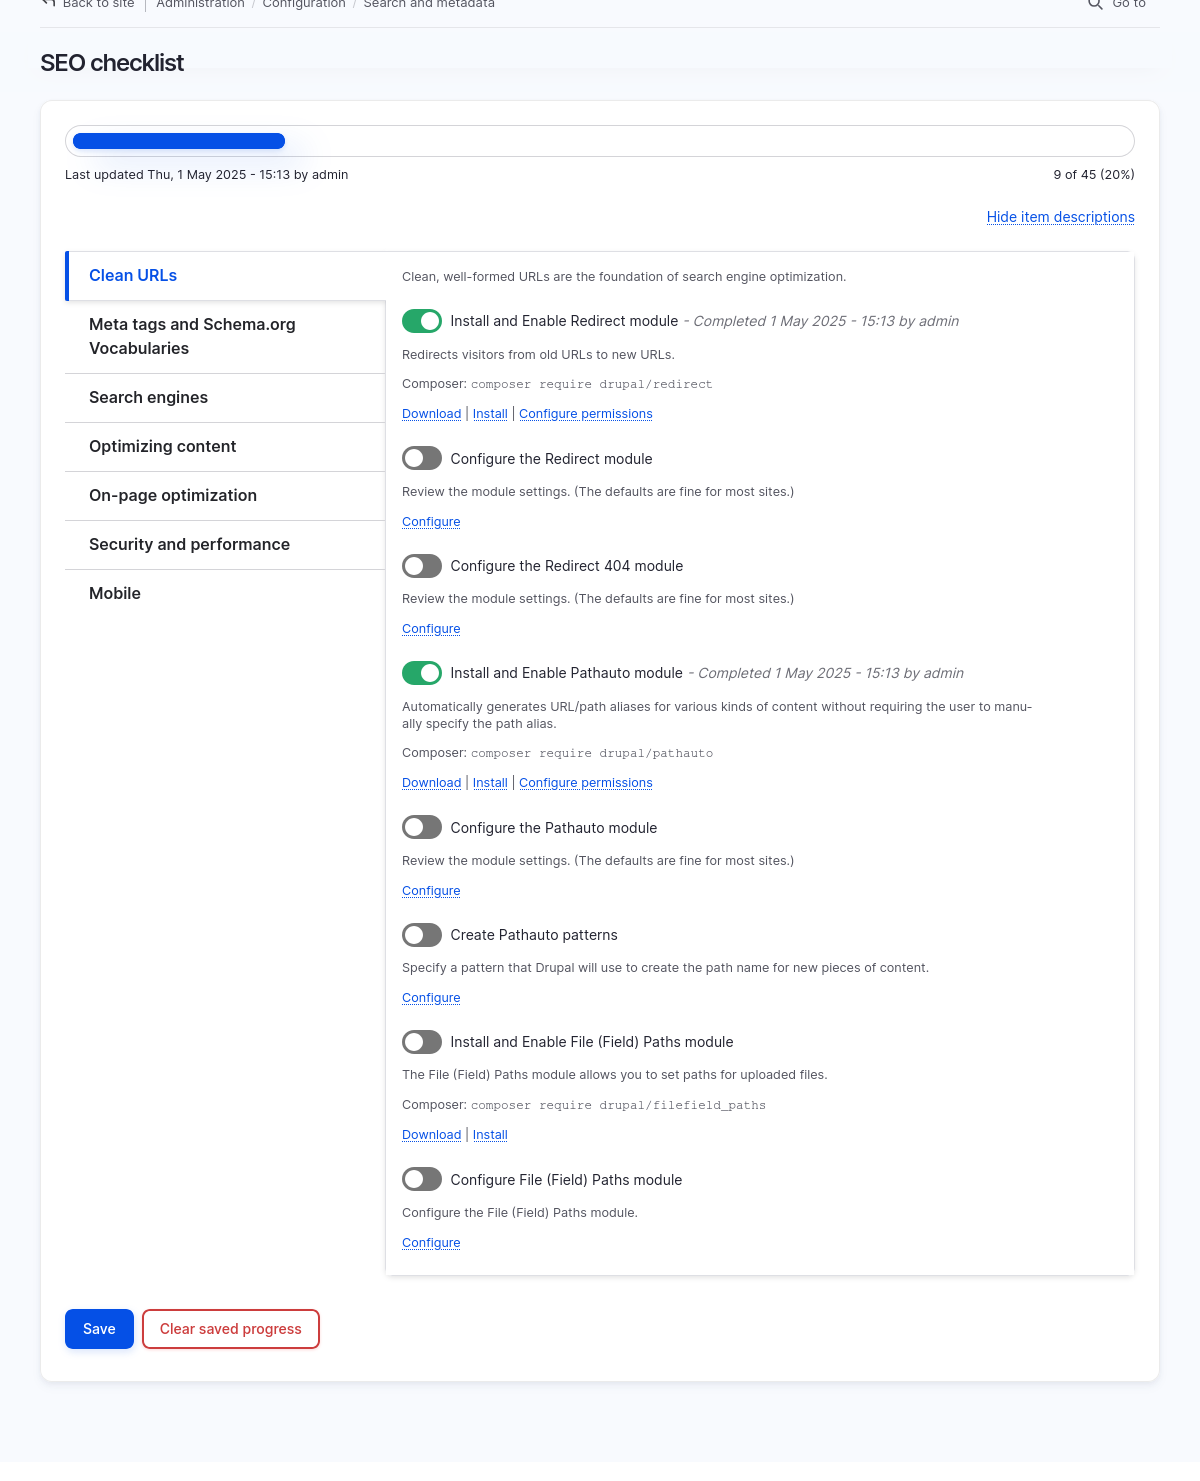
Clean URLs
Clean, well-formed URLs are essential for improving your website's search engine optimization (SEO). They help search engines better understand the content of your pages and improve the user experience.
Install and enable Redirect module
- Status: ✅ Completed by default
- What’s this about? Drupal CMS automatically installs and enables the Redirect module when you install the SEO Tools add-on. Redirect module helps your site automatically redirect visitors from outdated or changed URLs to their current location, preventing broken links, and helping search engines update their results.
- Recommended for: All Drupal CMS sites
- Terms to know:
- Redirect: An instruction that automatically sends visitors from one URL to another. Related to a URL alias which is used to set a canonical keyword-rich URL for content. When a URL alias is updated manually, a redirect is created to the content’s current alias.
- Next step:
- Use the provided Configure permissions link to review which user roles have permission to create redirects.
Configure the Redirect module
- Status: Not completed by default
- Recommended for: All Drupal CMS sites
- Next steps:
- Use the provided Configure link to verify or update the default settings for the Redirect module. For most sites, the default settings will be appropriate.
- To add or manage redirects, use the administrative toolbar, go to Configuration > Search and metadata > URL redirects (admin/config/search/redirect).
Configure the Redirect 404 module
- Status: Ongoing maintenance task.
- What’s this about? The Redirect 404 module keeps a list of “404: Not Found” URLs accessed by visitors, which you can then create redirects for or ignore. The default settings typically work well for most sites.
- Terms to know:
- 404 error: Occurs when a requested page cannot be found. Named for the HTTP status “404: Page Not Found”.
- Recommended for: All Drupal CMS websites
- Next steps:
- Use the provided Configure link to view a list of “not found” pages accessed by site visitors and add redirects where appropriate.
- Access settings for both Redirect and Redirect 404 modules at Configuration > Search and metadata > URL redirects > Settings (admin/config/search/redirect/settings).
Install and enable Pathauto module
- Status: ✅ Completed by default
- What’s this about? Drupal CMS includes the Pathauto module and installs it during initial setup. Pathauto generates clean and meaningful URL aliases for your content, improving readability and SEO.
- Recommended for: All Drupal CMS sites
- Terms to know:
- URL alias: A SEO- and user-friendly version of a URL that's easy to read and remember. For example, /wine-tours-in-oregon as an alias of /node/42. Both URLs will point to the same page, but /wine-tours-in-oregon would be the preferred canonical URL.
- Next step:
- Use the provided Configure permissions link to review which user roles have permission to perform tasks related to pathauto and URL aliases.
Configure the Pathauto Module
- Status: ✅ Completed by default
- What’s this about? A user with permission to administrate pathauto can configure how pathauto generates and updates URL aliases.
- Recommended for: All Drupal CMS sites
- Terms to know:
- Transliteration: Swap letters into their phonetic equivalent in ASCII characters. URLs only support ASCII characters. Since URL aliases are based on the title of content by default, it’s important that letters with accents or other non-ASCII characters be transliterated.
- Next steps:
- Use the provided Configure link to review Pathauto’s settings. The default settings are usually adequate for most sites.
Create Pathauto patterns
- Status: Not completed by default.
- What’s this about? All built-in content types already have URL alias patterns pre-defined. You should review the URL alias patterns before you start creating content so that your URLs are consistent, organized, and SEO-friendly.
- Recommended for: All Drupal CMS sites
- Terms to know:
- Entity types: The different kinds of things your Drupal CMS site is made of. A common entity type is a content type. Since content types have dedicated pages, patterns for their URL aliases have already been set up by the system.
- Pattern: A pattern for a URL alias can include URL-safe characters such as a slash (/), hyphen (-), letters a-z, numbers 0-9, and tokens.
- Token: Tokens are dynamic placeholders that are replaced by entity-specific values. They are surrounded by square brackets and refer to fields on entities. For example, [node:title] is a placeholder for the title of the content.
- Next steps:
- Review existing patterns for built-in content types. Select Edit from the Operations dropdown to make changes.
- For custom content types, we recommend you pick a pattern from another content type, select Duplicate from the Operations column, then edit the pattern as appropriate.
Install and enable File (Field) Paths module
- Status: Not completed by default.
- What’s this about? File (Field) Paths module is useful if you regularly upload images or documents and need structured, consistent paths like /files/articles/[title]/image.jpg.
- Recommended for: Special cases only
- Next steps:
- Download and install this module if your site requires specific paths for uploaded files, such as images or documents.
Configure File (Field) Paths module
- Status: Not completed by default.
- Recommended for: Sites where the File (Field) Paths module is installed
- Next steps:
- Use the provided Configure link to configure patterns for file field paths.
Back to top
Meta Tags and Schema.org Vocabularies
Search engines use your site's meta tags—such as page titles and descriptions—to understand what your content is about. The following items help you set and manage this essential metadata.
Install and enable Metatag module
- Status: ✅ Completed by default
- What’s this about? Drupal CMS automatically installs the Metatag module when you install SEO Tools. Metatag module allows you to add descriptive information (meta tags) to your site's pages, improving your content's visibility in search engines.
- Recommended for: All Drupal CMS sites
- Terms to know:
- Meta tags: HTML tags used by search engines to determine page content and display relevant information in search results. Common examples include the page title and description. Learn more in SEO essentials: what you should know.
- Next steps:
- Use the provided Configure permissions link to ensure that only trusted user roles have permission to manage Metatag module's settings.
Install and enable Schema Metatag module
- Status: Not completed by default.
- What’s this about? Have you ever noticed direct links to a menu or recipe within a search result? This is made possible by adding structured data formatted as JSON-LD markup in the header of your pages. Schema Metatag module does this for you in your Drupal CMS site.
- Recommended for: Sites aiming for enhanced search engine presentation or advanced SEO implementations, especially if your content includes recipes, products, events, or articles intended to appear with rich snippets in search engine results.
- Terms to know:
- Schema.org: A structured data vocabulary used by search engines to better interpret your site's content and potentially enhance how it appears in search results.
- JSON-LD: A lightweight, search-engine-friendly format for structured data markup.
- Next steps:
- Download and install Schema Metatag module.
- Install the appropriate modules for specific structured data types. Go to Extend > List and enter “Schema.org” into the Filter field. Scan through the list of modules and install the ones that match the type of content on your site.
- When you install a Schema.org module, a group of fields named for the module are added to the Metatag defaults settings at Configuration > Search and metadata > Metatag (admin/config/search/metatag). Under Operations, select Edit for each Type and locate the Schema.org fields at the bottom of the form to configure.
Set meta tags for your site
- Status: Pre-configured by Drupal CMS and Metatag module.
- What’s this about? Properly configured meta tags significantly improve search visibility and click-through rates by clearly indicating your content's topic to search engines and users.
- Recommended for: All Drupal CMS websites
- Next steps:
- Use the provided Configure link to review Metatag’s defaults or navigate to Configuration > Search and metadata > Metatag (admin/config/search/metatag).
- If you need to edit a default meta tag value, select Edit from the Operations column.
Install and enable alternate Hreflang module
- Status: Not completed by default
- What’s this about? For multilingual sites, Hreflang module automatically adds hreflang tags to the page for each enabled language. This tag helps search engines understand language variations of your content, significantly improving international SEO.
- Recommended for: Multilingual sites
- Terms to know:
- hreflang: An HTML attribute indicating the language and geographic targeting of a webpage, helping search engines deliver the correct language version to international visitors.
- Next steps:
- If your site is set up as multilingual, the hreflang module will automatically add the tag to language variations of your content.
- Learn more about how Google handles language variations of your content (developers.google.com)
- Learn more about making your Drupal site multilingual (Drupal User Guide)
Back to top
Search Engines
Set your site up with search engines and submit your XML sitemap to improve discoverability.
Install and Enable Simple XML Sitemap Module
- Status: ✅ Completed by default
- What’s this about? Drupal CMS automatically installs Simple XML Sitemap module when you install SEO Tools. The Simple XML Sitemap module creates an XML sitemap to help search engines readily find and index your site's content.
- Recommended for: All Drupal CMS sites
- Terms to know:
- XML Sitemap: A structured list of URLs formatted in XML that allows search engines to easily crawl and index your website content.
- Next steps:
- Use the provided Configure permissions link to ensure the appropriate user roles have permission to perform tasks related to the sitemap.
Configure XML Sitemap Module
- Status: Not completed by default
- What’s this about? Configure your sitemap’s settings and what types of content will appear in your site’s XML sitemap.
- Recommended for: All Drupal CMS sites
- Next steps:
- Use the provided Configure link to view and modify XML Sitemap’ settings or go to Configuration > Search and metadata > Simple XML Sitemap > Settings (admin/config/search/simplesitemap/settings).
- Within Simple XML Sitemap’s configuration pages, use the Inclusion tab to modify which entity types are included in the sitemap (admin/config/search/simplesitemap/entities).
Install and Enable RobotsTxt Module
- Status: ✅ Completed by default
- What’s this about? The RobotsTxt module is installed by the SEO Tools add-on and enables you to manage your site’s robots.txt file using the administrative UI. The robots.txt file tells search engine crawlers which parts of your site to index or exclude.
- Recommended for: All Drupal CMS sites.
- Terms to know:
- robots.txt: A file that instructs search engines about pages or files they can or cannot access on your site.
- Next steps:
- Drupal CMS includes a robots.txt file in the web/ directory. Once you have the RobotsTxt module installed, delete or rename the robots.txt file in the root of your Drupal installation. Otherwise, the module cannot receive requests for the /robots.txt path and your webserver (host) will serve the static file first.
-
To prevent the robots.txt static file from being added when you update your site, in your project's composer.json file, under the
"extra"key, under"drupal-scaffold", add (or update) thefile-mappingsection and add"[web-root]/robots.txt": false:"extra": { "drupal-scaffold": { "locations": { "web-root": "web/" }, "file-mapping": { "[web-root]/robots.txt": false } }, - Use the provided Configure permissions link to verify or update which user roles have permission to administer robots.txt via Drupal CMS’s UI.
Verify XML Sitemap in robots.txt
- Status: ✅ Completed by the SEO Tools add-on
- What’s this about? You want to make sure your site’s XML sitemap URL is included in the robots.txt file to assist search engines in locating your sitemap quickly.
- Recommended for: All Drupal CMS websites
- Next steps:
- Access your site’s robots.txt file within Drupal CMS. Go to Configuration > Search and metadata > RobotsTxt (/admin/config/search/robotstxt). Scroll through the contents and verify the line
Sitemap: /sitemap.xmlexists.
- Access your site’s robots.txt file within Drupal CMS. Go to Configuration > Search and metadata > RobotsTxt (/admin/config/search/robotstxt). Scroll through the contents and verify the line
Set up cron
- Status: By default, Cron is set up to run every 3 hours.
- What’s this about? Cron takes care of running periodic tasks like checking for system updates and updating the internal search index with new content. By default, Simple XML Sitemap is configured to update sitemap generation on every cron run.
- Recommended for: All Drupal CMS sites.
- Next steps:
- Verify that cron is set up to run on a schedule that makes sense given how often new content is published.
Google accounts sign-ups
- Status: Not completed by default
- What’s this about? A Google Account (Gmail or Workspace) will give you access to all Google services including Google Tag Manager, Google Analytics, and Search Console. A Google Tag Manager Container ID is required when installing the Google Analytics recommended add-on, which includes Google Tag Manager module. See Introduction to tags and analytics in Drupal CMS for more information.
- Recommended for: All Drupal CMS websites
- Next steps:
- Refer to the Set up Google Analytics in Drupal CMS documentation.
Install and Enable Google Tag Manager module
- Status: Not completed by default
- What’s this about? When you install the Google Analytics add-on, you will need your Google Tag Manager Container ID to complete installation.
- Recommended for: Sites using Google Tag Manager module. In Drupal CMS, this module is installed by the Google Analytics recommended add-on.
- Next steps:
- Refer to the Set up Google Analytics in Drupal CMS documentation.
- Use the provided Configure permissions link to ensure that only trusted roles have permission to administer Google Tag containers.
Configure Google Tag Manager module
- Status: Partially completed upon installation of Google Analytics add-on.
- What’s this about? Complete configuration to set up Tag Settings for your site.
- Recommended for: Sites using Google Tag Manager. In Drupal CMS, this module is installed by the Google Analytics recommended add-on.
- Next steps:
- When you installed the Google Analytics add-on, you should have entered your Google Tag Manager ID which will be used to configure the module. See: Set up Google Analytics in Drupal CMS.
- If you need to add or change your Google Tag Manager ID, or customize settings for Google Tag Manager module, go to Configuration > Web services > Google Tag (admin/config/services/google-tag).
Submit XML Sitemap to Google
- Status: May already be completed via a sitemap entry in robots.txt.
- What’s this about? Google can find your site’s sitemap.xml file in several ways including using Google’s Search Console, Search Console API, or a Sitemap entry in your site’s robots.txt file. You may have already verified that there is a sitemap entry in robots.txt.
- Next steps:
- See the previous step, “Verify XML Sitemap in robots.txt”. If there is a sitemap entry, Google will likely find it.
- See Google’s documentation for more information and options about submitting your sitemap to Google (developers.google.com).
Get a Microsoft account
- Status: Not completed by default
- What’s this about? A Microsoft account will give you access to Bing’s Webmaster Tools. Note: You can sign in to Microsoft Bing’s Webmaster Tools with a Microsoft, Google, or Facebook account.
- Next steps:
- Go to Microsoft Bing’s Webmaster Tools and press the Sign In button. Choose a method to sign in. If you choose Microsoft and you don’t already have an account, use the provided link to create a new account.
Authenticate with Bing
- Status: Not completed by default
- What’s this about? You can use Microsoft Bing’s Webmaster Tools to authenticate ownership of your site with Bing. By authenticating site ownership with Bing, you’ll be able to use Bing’s Webmaster Tools and gain insight into how your site is performing in Bing.
- Next steps:
- Go to Microsoft Bing’s Webmaster Tools and press the Sign In button. Choose a method to sign in. If you choose Microsoft and you don’t already have an account, use the provided link to create a new account.
- Follow Microsoft Bing’s documentation on adding a site to Bing Webmaster Tools.
Submit XML sitemap to Bing
- Status: May already be completed via a sitemap entry in robots.txt.
- What’s this about? Bing can find your site’s sitemap.xml file in several ways including submitting your XML sitemap with the Sitemaps tool or a Sitemap entry in your site’s robots.txt file. You may have already verified that there is a sitemap entry in robots.txt.
- Next steps:
- See the previous step, Verify XML Sitemap in robots.txt. If there is a sitemap entry, Bing will likely find it.
- See Microsoft Bing’s documentation on Sitemaps for more information about submitting a sitemap to Bing.
Back to top
Optimizing content
Well-written and optimized content is critical for both search engines and your visitors, improving visibility and user engagement.
Install and Enable Easy Breadcrumb module
- Status: ✅ Completed by default
- What’s this about? Drupal CMS includes and installs the Easy Breadcrumb module, automatically generating breadcrumbs based on URL and page titles to enhance navigation. Breadcrumbs helps both users and search engines understand your site’s structure and navigate your site.
- Recommended for: All Drupal CMS websites
- Terms to know:
- Breadcrumbs: A navigation aid showing the user's path to the current page, e.g., Home > Blog > Top 10 Reasons to Visit Wine Country This Spring
- Next step:
- Use the provided Configure permissions link to verify roles that can administer Easy Breadcrumb module’s settings.
Configure Easy Breadcrumb Module
- Action required: Review breadcrumb settings to ensure they meet your site's navigational needs.
- Recommended for: All Drupal CMS websites
- Next step:
- Go to Content and select an item to view to see how the breadcrumbs display.
- Use the provided Configure link to review and modify the settings for Easy Breadcrumbs.
Install and Enable Editor Advanced Link Module
- Status: Not completed by default
- What’s this about? The Editor Advanced Link module enables content editors to add special attributes to links using CKEditor.
- Recommended for: Sites needing advanced link customization (titles, classes, targets).
- Next steps:
- Download and install Editor Advanced Link module.
Configure Text Formats for Editor Advanced Link module
- Status: Not completed by default
- What’s this about? After you install the Editor Advanced Link module, you need to tell CKEditor which attributes you want to enable.
- Recommended for: Sites using Editor Advanced Link module.
- Next steps:
- Use the provided Configure link which will take you directly to Configuration > Content authoring > Text formats and editors. For the Content text format, press Configure under Operations.
- Scroll down to the CKEditor 5 plugin settings and select Advanced links.
- Toggle “on” each attribute that you want to enable in content editing.
- Scroll down to the bottom of the page and press Save configuration.
Install and Enable HTML Sitemap Module
- Status: ✅ Completed by default
- What’s this about? Provides a user-friendly sitemap for easy site navigation and overview, including optional RSS feed displays. Note: The sitemap produced by this module is a user-facing page and is distinct from the XML Sitemap which is optimized for search engines.
- Recommended for: All Drupal CMS websites
- Next steps:
- Use the provided Configure permissions link to review and modify the permissions for Sitemap.
Configure HTML Sitemap Module
- Status: ✅ Completed by default
- What’s this about? HTML Sitemap has been configured with default settings. Review and update the settings as desired.
- Recommended for: All Drupal CMS websites.
- Next steps:
- Use the provided Configure link to configure settings for the HTML Sitemap module or go to Configuration > Search and metadata > Sitemap (admin/config/search/sitemap). The default settings will work for most sites.
Install and Enable Search 404 Module
- Status: Not completed by default. No stable release currently compatible with Drupal CMS. (Will be compatible when a stable release compatible with Drupal 11 is available.)
- What’s this about? The Search 404 module replaces the standard "404 Page not found" with search results based on the missing page's keywords. This can help your users find content they were looking for or encourage site exploration if the search results are relevant. The HTTP status is not changed from 404, so you can still identify broken links.
- Recommended for: Advanced users who are familiar with installing pre-release versions of Drupal modules and configuring internal site search.
- Next steps:
- See the project page to see if there is a stable release for Drupal 11.
Configure Search 404 Module
- Status: Not completed by default.
- What’s this about? Define how the Search 404 module interacts with visitors and integrates with your internal search functionality.
- Recommended for: Drupal sites with Search 404 module installed.
- Next steps:
- If the Search 404 module is installed, use the provided Configure link to configure the module to work with your site’s search functionality.
Back to top
On-page Optimization
Optimize individual pages of your website for maximum visibility and engagement.
Install and Enable Real-time SEO for Drupal module
- Status: ✅ Completed by default
- What’s this about? Drupal CMS installed and enabled Real-time SEO for Drupal, assisting you in optimizing your content naturally around keywords. Use Real-time SEO in the SEO optimization section of the content editing form.
- Recommended for: All Drupal CMS websites
Configure Real-time SEO for Drupal Module
- Status: ✅ Completed by default for built-in content types.
- Action required: Select the content types to be evaluated for SEO best practices.
- Recommended for: All Drupal CMS websites
- Next steps:
- Edit a content item and look under the SEO optimization section to check out Real-time SEO’s features.
- To customize Real-time SEO settings, use the provided Configure link or go to Configuration > Search and metadata > Real-time SEO for Drupal (admin/config/yoast_seo).
- To add the SEO fieldset to content types added after you installed SEO Tools, reinstall the SEO Tools add-on by navigating to Extend > Recommended > SEO Tools and pressing Reinstall. This will add the SEO Information fields to existing content types.
Verify Create New Revisions is enabled
- Status: ✅ Completed by default for built-in content types.
- Action required: Ensure new revisions are enabled for all content types to track SEO performance changes effectively.
- Recommended for: All Drupal CMS websites
- Next steps:
- You can check to see if revisions are enabled for content types by navigating to Structure > Content types (admin/structure/types). Select Edit from the Operations drop-down and scroll down to Publishing options to ensure that the Create new revision box is checked.
Install and Enable Diff Module
- Status: Not completed by default
- What’s this about? Install the Diff module to view changes between different revisions clearly.
- Recommended for: All Drupal CMS websites
- Next steps:
- Download and install the Diff module.
Configure Diff Module
- Status: Configured with default settings which you can modify.
- Action required: Adjust settings for how changes between content revisions are displayed.
- Recommended for: All Drupal CMS websites
- Next steps:
- Use the provided Configure link to make any changes to the Diff module’s default settings or go to Configuration > Content authoring > Diff (admin/config/content/diff/general).
Back to top
Security and Performance
A well-optimized site must also be secure and performant. Follow these steps to ensure your site remains fast, safe, and reliable.
Install and Enable Security Review Module
- Status: Not completed by default
- What’s this about? Install this module to automatically test for common security vulnerabilities.
- Recommended for: All Drupal CMS websites
- Next steps:
- Download and install the Security Review module.
- Use the provided Configure permissions link to ensure the appropriate roles have permission to access and run security review checks.
Configure Security Review Module
- Status: Not completed by default
- What’s this about? Select and configure the specific security checks to run.
- Recommended for: All Drupal CMS websites with the Security Review module installed.
- Next step:
- Use the provided Configure link, then navigate to the Help tab to read more about security review checks or go to Configuration > System > Security Review (admin/config/security-review).
- Use the Settings tab to update the default configuration.
- Use the Run & review tab to run the security check.
Run a Speed Test for your site
- Status: Not completed by default
- What’s this about? Search engines like Google consider page speed as a ranking factor. Perform site speed tests to establish performance benchmarks.
- Recommended for: All Drupal CMS websites
- Next steps:
- Run a speed test using one or more of the tools listed below.
- Tools:
- Google PageSpeed Insights
- WebPageTest.org
Secure Your Website with HTTPS
- Status: Dependent on your site’s hosting
- What’s this about? HTTPS protects the information sent between your site and a user’s browser – like passwords or personal information – is encrypted. Sites without HTTPS may show a “Not secure” warning to visitors, harming your site’s credibility. Search engines like Google prioritize secure websites and HTTPS is a confirmed ranking factor.
- Recommended for: All Drupal CMS sites
- Next steps:
- When you have moved your site to a hosting provider, ensure that your site has an SSL certificate. Choosing a hosting provider that handles installing and renewing your site’s SSL certificate is highly recommended.
Adjust Performance Admin Settings
- Status: ✅ Completed by default, but may be turned off in local development environments.
- What’s this about? On any given page on your Drupal CMS site, there may be many files attached that handle style and behavior. Drupal CMS aggregates these files to make your site more performant. Aggregation of CSS and JS files is turned on by default. But if you’re developing a custom theme, you may have turned off certain caching or CSS and JS aggregation, so it’s important to double-check that caching and aggregation are turned on for the live site.
- Recommended for: All Drupal CMS websites
- Next Steps:
- Verify CSS and JavaScript aggregation and ensure caching settings are optimized on the live site by using the provided Configure link, or go to Configuration > Development > Performance (admin/config/development/performance).
- Under Caching, ensure that there is a reasonable value for Browser and proxy cache maximum age. (The default value is 15 minutes.)
- Under Bandwidth optimization, ensure both aggregation options are toggled “on”.
- Verify CSS and JavaScript aggregation and ensure caching settings are optimized on the live site by using the provided Configure link, or go to Configuration > Development > Performance (admin/config/development/performance).
Set Up a CDN (Cloudflare, etc.)
- Status: Not completed by default.
- What’s this about? If you have a high-traffic site, consider integrating Cloudflare or similar CDN services for improved global performance and security.
- Recommended for: Sites with international or high-traffic audiences
- Next steps:
- Check with your hosting provider about any CDN integration they provide
- Install Cloudflare module
Move to Fast Hosting
- Status: Depends on your hosting provider.
- What’s this about? Consider upgrading your hosting solution to significantly improve site performance and search rankings.
- Recommended for: Websites experiencing slow response times or performance bottlenecks
- Next steps:
- Run performance analysis to determine how your site’s performance could improve, and if changing your hosting provider is warranted.
Back to top
Mobile
A mobile-friendly website ranks better in many search engines, including Google, ensuring optimal viewing experiences across devices.
Verify Your Website is Responsive
- Status: Depends on your theme.
- What’s this about? Ensure your website provides a responsive design suitable for all devices. Verify by using Google's test tool.
- Recommended for: All Drupal CMS websites
- Next step:
- Test Website Responsiveness (pagespeed.web.dev)
Back to top
Wrap-up
Optimizing your site for SEO is an important part of driving traffic to your content. The SEO Checklist built into Drupal CMS provides a list of actionable items (described in detail above) that can help you improve your site’s SEO.
Back to top