Drupal CMS enables you to manage all your site’s content. Whether you're publishing a new page, reviewing articles, or scheduling blog posts, you’ll need to know which tools to use and where to find them.
In this tutorial, we’ll tour the administrative UI, focusing on where to find content administration tools for different types of content including entities like media, webforms, and blocks.
Back to topGoal
Get oriented to the different content administration areas in Drupal CMS so you can confidently create, edit, and administer the content on your site.
Back to topDashboard
When you first install Drupal CMS, the Dashboard contains a list of recent content and top tasks, which include “Create content” and “Create content type”.
Where to find it
- Using the administrative toolbar, go to Dashboard (/admin/dashboard).
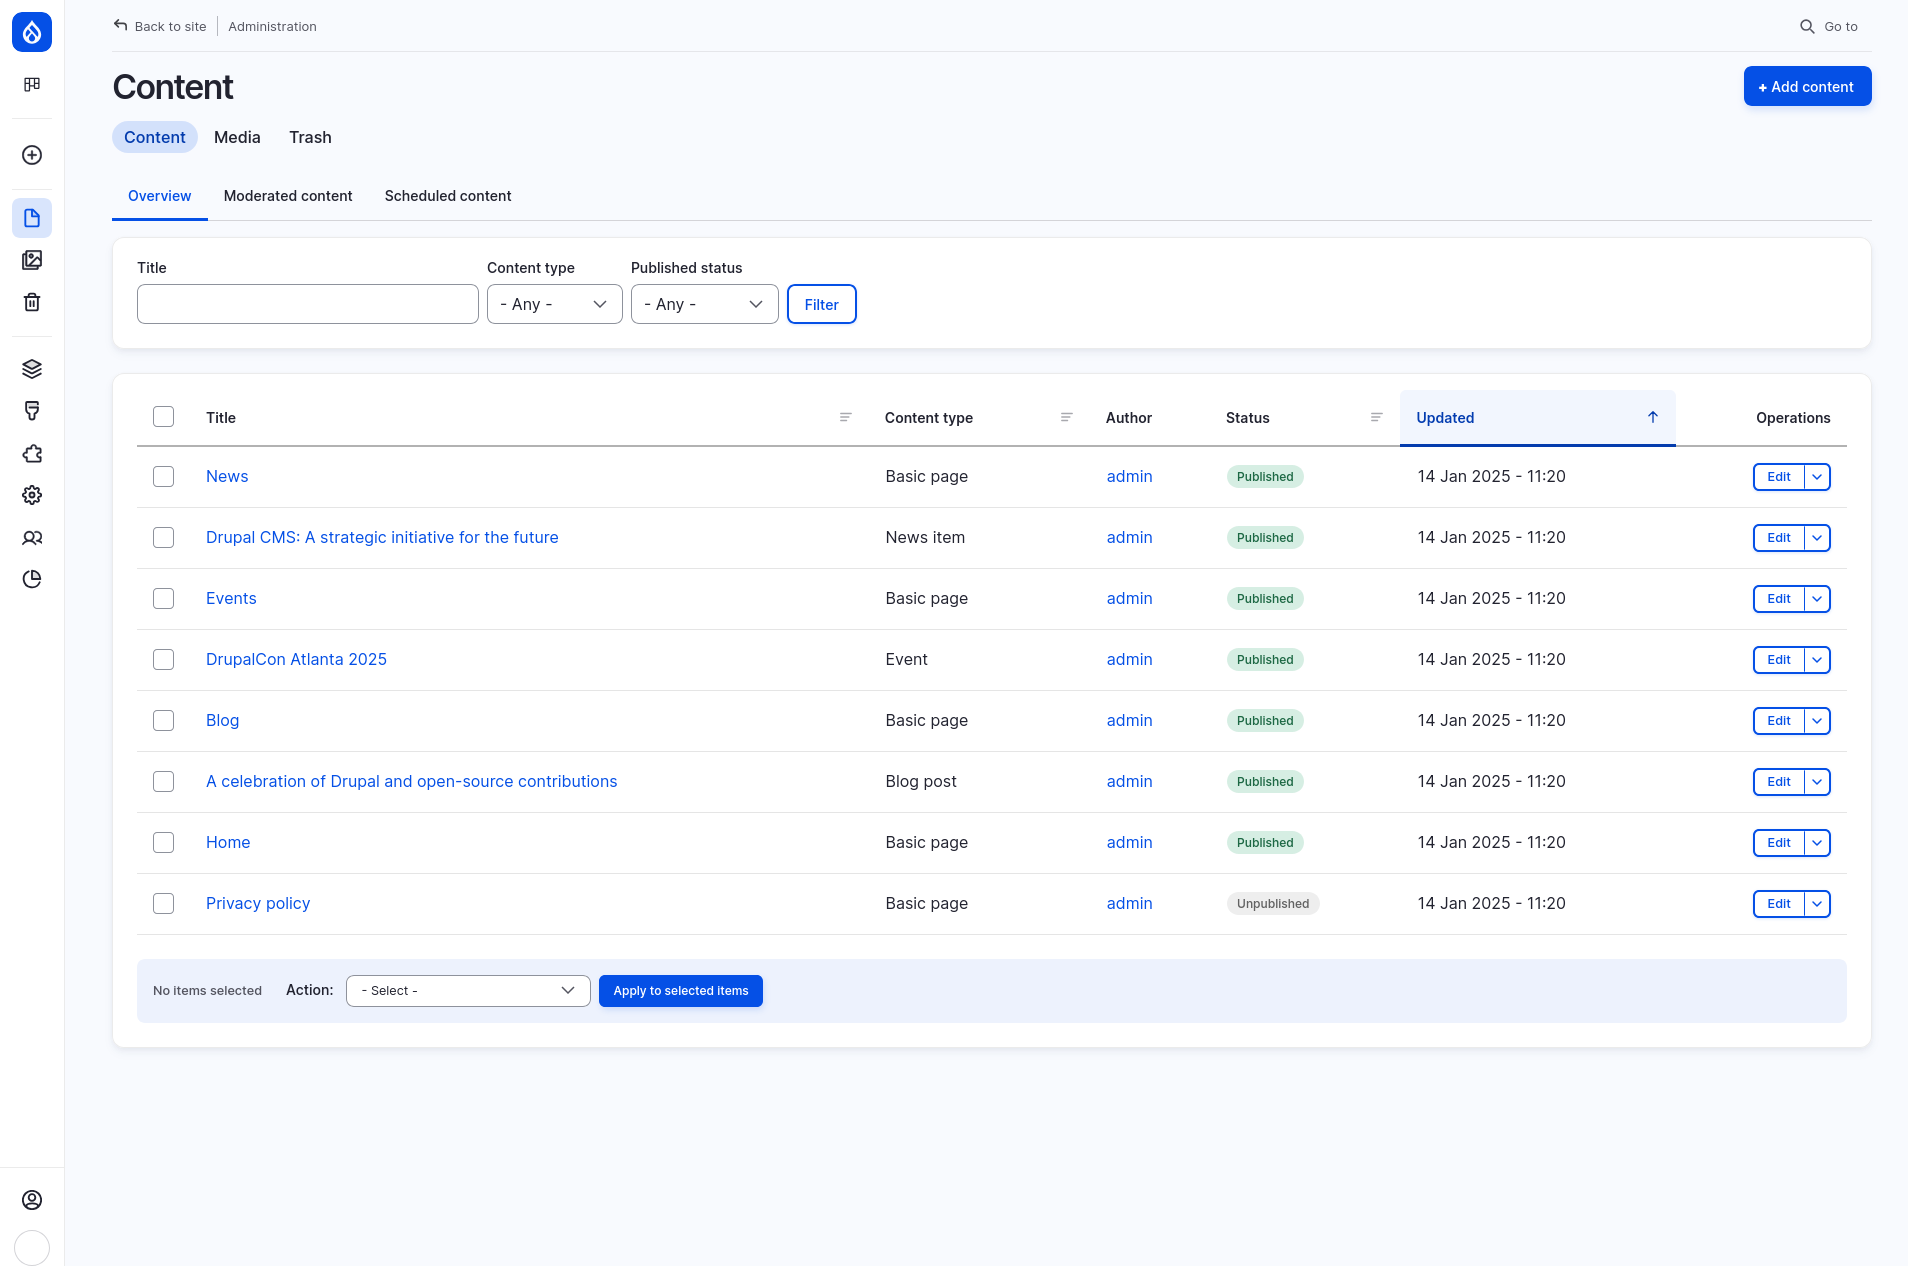
Content
This is your main hub for content administration. It’s a handy page to locate specific content or unpublished drafts and quickly access links to view, edit, or perform other administrative tasks on your site’s content.
Where to find it
- Using the administrative sidebar, go to Content (/admin/content).
What you can do here
Each user in Drupal CMS is assigned one or more roles. Each role is assigned permissions, which allow—or disallow—users in that role from performing administrative tasks in Drupal CMS. What operations you can do on this page will depend on your permissions. If you see an action here that you need access to but don’t see, ask your site administrator if you need to be added to a role with more permissions. Learn more: Concept: Users, Roles, and Permissions (Drupal User Guide).
- Access all content on your site.
- Add new content by clicking the +Add content button in the top right corner of the page.
- Use filters to narrow the list of content by words in a title, content type, or publishing status.
- Sort the content by clicking on a sortable column header indicated by a 3-stacked-lines icon. An up- or down-arrow will appear next to the column header indicating that the content is being sorted by that heading, either ascending or descending.
- To view a content item, click on the linked title.
- To edit a content item, under the Operations column, click Edit.
- To delete a content item, under Operations, select Delete. You will be asked to confirm that you want to delete that item.
- Note: Access deleted content by clicking the Trash tab (admin/content/trash). You can restore deleted content items by selecting Restore from the Operations column.
- To duplicate a content item, under Operations, select Duplicate.
- Some actions may be performed on multiple items at once (also called bulk operations).
- Select the checkbox next to the title of the content items you want to update.
- All items may be selected at once by selecting the checkbox in the column header row.
- Scroll down to the bottom of the table, and use the Action dropdown to view all available actions and to select an action.
- Click the button Apply to selected items to perform the action on all selected items.
- Warning: You may not be asked to confirm the action!
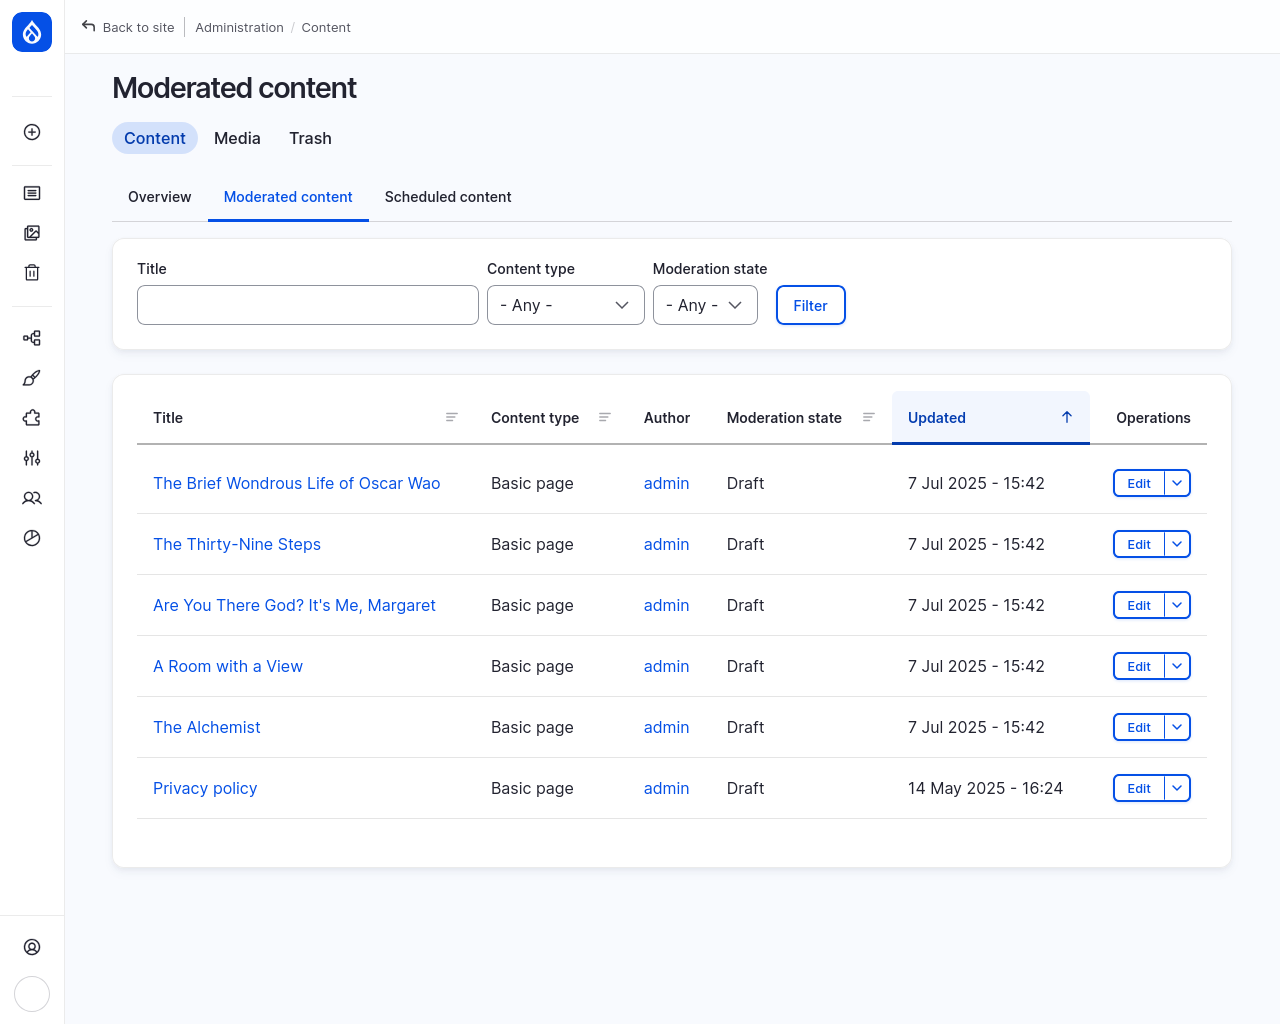
Moderated content
The Moderated content page contains a list of unpublished content that you can sort or filter by moderation state.
Where to find it
- Using the administrative sidebar, go to Content > Moderated content (/admin/content/moderated).
What you can do here
- If your site uses content moderation, this page shows what’s waiting for review or approval.
- Use filters to narrow the list of content by words in a title, content type, or moderation state.
- View, edit, delete, and duplicate content like you would on the Content Overview page (see above).
- Tip: Only content that has content moderation enabled will be listed here. To access unpublished content that doesn’t use moderation, click on the Overview tab to return to the main Content admin page and use the Publishing status filter to filter content by Unpublished.
Scheduled content
The Scheduled content page contains a list of content that is scheduled to be published or unpublished.
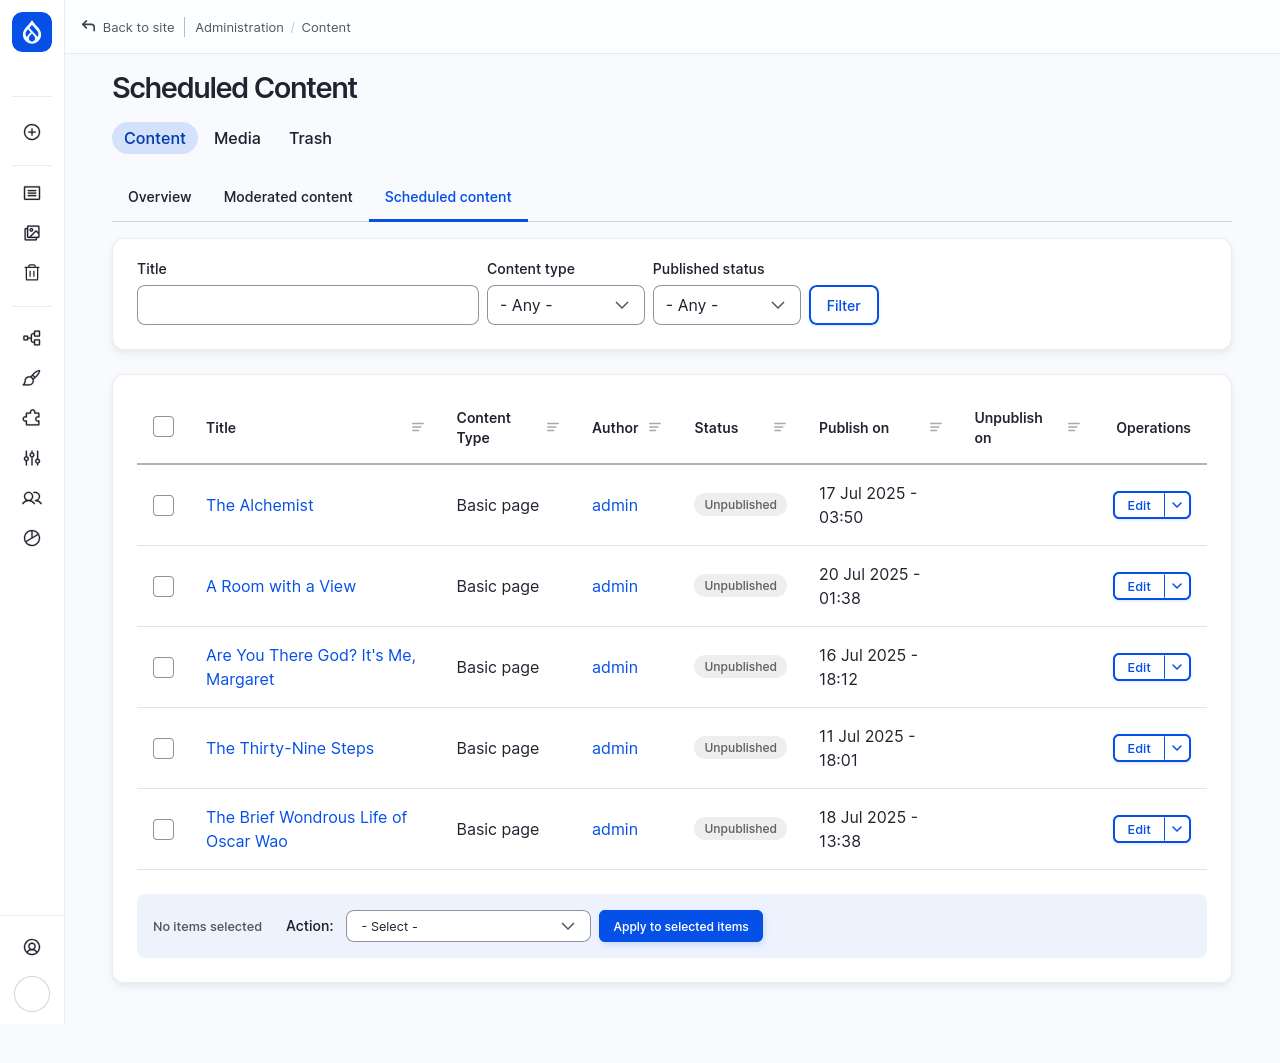
Tip: Content can be scheduled for publishing or unpublishing when you edit content under the Scheduling options tab in the sidebar.
Where to find it
- Using the administrative sidebar, go to Content > Scheduled content (/admin/content/scheduled).
What you can do here
- See at-a-glance when content is scheduled to be published or unpublished.
- Access content to view or edit to adjust the scheduling options.
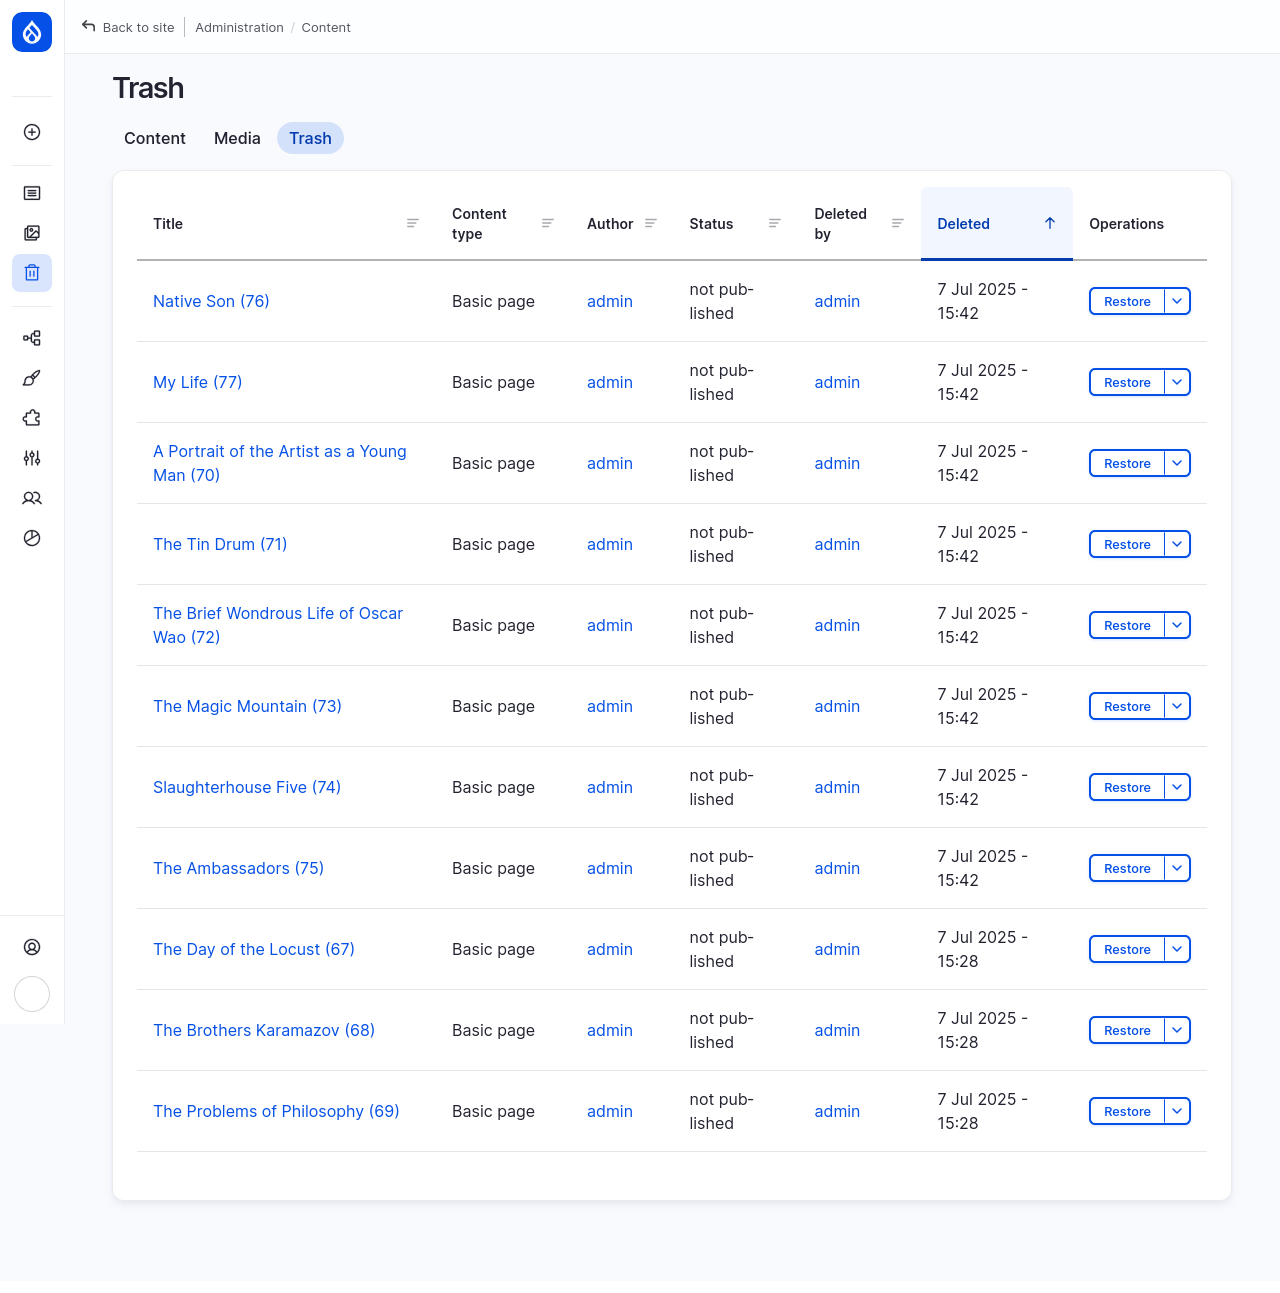
Trash
Content items that have been deleted are listed on the Trash page where you can restore them if necessary. When you delete content, on the confirmation page, a message will state whether the deleted content can be restored on the Trash page.
Where to find it
- Using the administrative sidebar, go to Trash (/admin/content/trash).
- If you’re already in the Content admin area, click on the Trash tab.
What you can do here
- Access all deleted and restorable content items.
- To restore deleted content, select Restore under Operations and confirm.
Media
The Media page is your site’s Media library. View all types of media added to your site in a list or grid format.

Where to find it
- Using the administrative sidebar, go to Media (/admin/content/media).
- If you’re already in the Content admin area, click on the Media tab.
What you can do here
- Access all media (document, image, remote video, SVG image, etc.) on your site.
- Add new media by clicking the +Add media button in the top right corner of the page.
- Display media in a list or grid by clicking the Table or Grid tabs.
- Use filters to narrow the list of media by words in the name, media type, or publishing status.
- On the Table tab, sort media by clicking on a sortable column header indicated by a 3-stacked-lines icon.
- On the Grid tab, sort media by selecting options (displayed next to the filter options).
- On the Table tab, edit media by clicking on the linked title or Edit button under Operations.
- On the Grid tab, edit media by clicking on the pencil icon on the thumbnail.
- On the Table tab, delete media by selecting Delete under Operations.
- On the Grid tab, delete media by clicking the X button.
- Note: You cannot undo or restore deleted media. It will not be listed in the Trash.
- Some actions may be performed on multiple items at once (also called bulk operations).
- Select the checkbox next to the title of the content items you want to update (Table tab) or on the thumbnail (Grid tab).
- All items may be selected at once by selecting the checkbox in the column header row (Table) or the Select all media checkbox (Grid).
- The action row will appear. Select an Action from the dropdown to view all available actions and to select an action to perform on all selected items.
- Click the button Apply to selected items to perform the action on all selected items.
- Warning: You may not be asked to confirm the action!
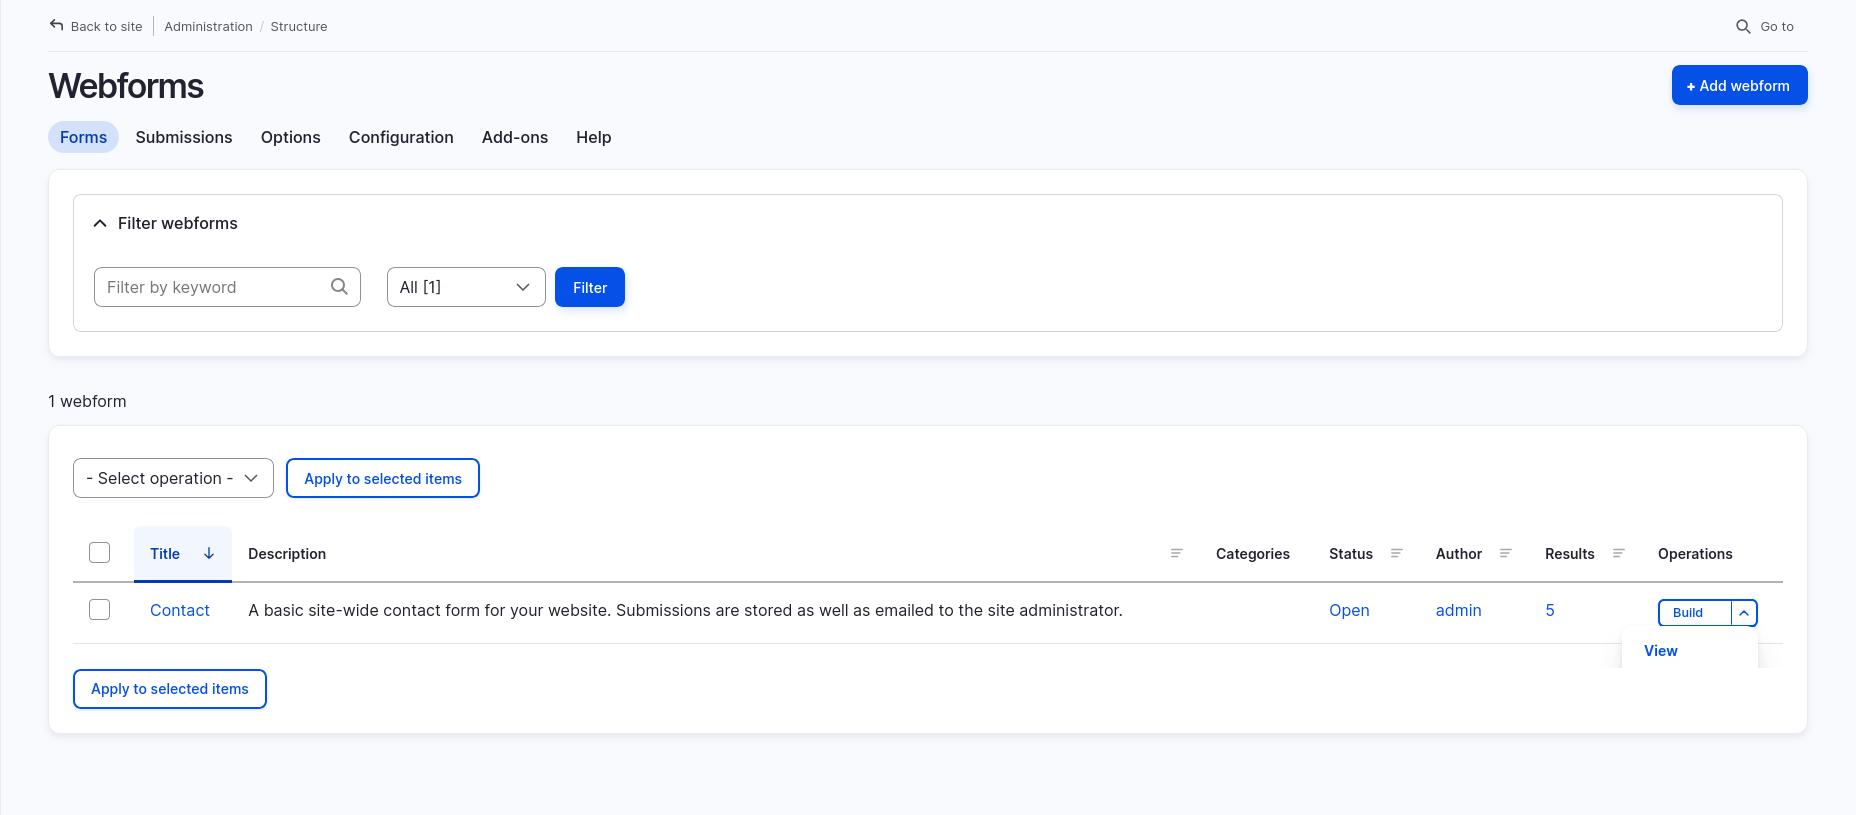
Webforms
If you have installed the Forms recommended add-on, you will be able to access these forms, called Webforms (after the name of the module that provides this feature), create new webforms, view submission results, and edit the configuration of existing webforms.
Where to find it
- Webform module must be installed before the menu item will appear in the administrative menu. Webform may be installed with pre-configured smart defaults and an example form with the Forms recommended add-on. Go to Extend > Recommended > Forms > Install. After installing the add-on, reload the page to update the administrative sidebar menus.
- Using the administrative sidebar, go to Structure > Webforms (/admin/structure/webform).
What you can do here
- Access all webforms, submissions, and settings.
- At-a-glance, view the title, description, categories, status, author, number of results, and access operations for each webform that has been added to your site.
- In the Webform area, click on the tabs to access: Forms, Submissions, Options, Configuration, Add-ons, and Help.
- Create a new webform by clicking on the +Add webform button on the top right corner of the primary Webforms (Forms tab) page.
Next
- Explore recommended add-ons that add new content types and forms to your site. See Adding functionality with smart defaults (Recommended add-ons) to learn more.
- Learn how to Create and publish content in Drupal CMS.
Wrap-up
The content administration tools in Drupal CMS are designed to make it easier to find, edit, and organize your site’s content. As your site grows, these tools help you stay in control—whether you're publishing daily updates or managing a large library of reusable media.
Next, try editing a page, uploading new media, or exploring the recommended add-ons to see what’s possible.
Back to top